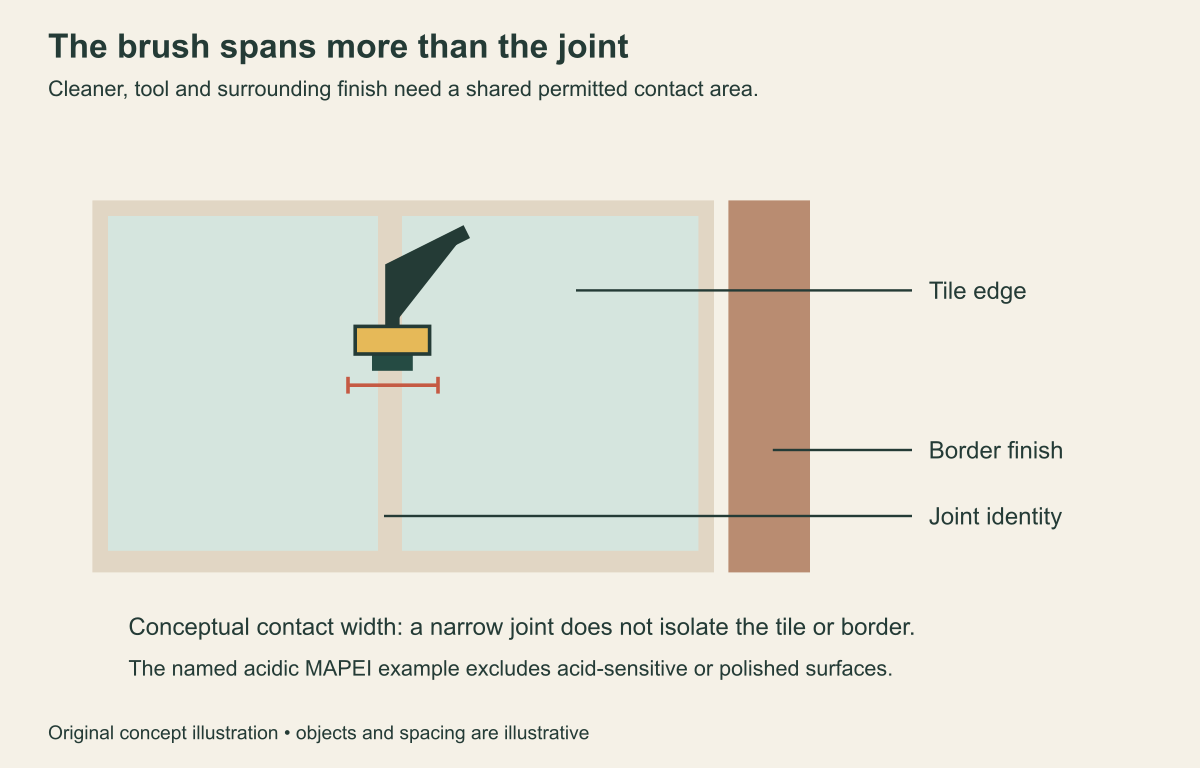
The dark line between two tiles is easy to focus on, but a grout-cleaning tool also touches the tile edges on either side. Plan the job around that whole contact area before deciding that a narrow brush or a stronger bottle is the answer.
This guide covers ordinary care planning for an identified tile-and-grout installation, rather than diagnosing every dark joint. Loose material, damaged joints and recurring changes need an installer’s assessment before another cleaning attempt.
You do not need to identify a grout chemistry from a photograph to make a useful first decision. You need the installation information, a compatible method and a clear observation of the particular line you want to improve.
Read the joint as part of an installation
Find the tile and grout names in the installation record, invoice or remaining product packaging if available. Keep information about any sealer or treatment with those names, because the visible joint is not necessarily the only material a cleaner contacts.
If you have only a general description such as bathroom tile, ask the installer for more detail. A close-up of the joint beside an overview of the room lets them see which installation you mean without guessing from a cropped dark line.
Include nearby thresholds, metal trim and natural-stone borders in the question if the proposed product could reach them. A cleaner selected for a ceramic tile field may still have to stay away from an adjacent material.
Do not assume a joint is cement-based, epoxy or a particular sealed product because it has a certain color or feels smooth. Those are observations you can record, while the maker or installation documentation supplies the actual identity.
Separate loose soil from a stubborn mark
Describe where the discoloration occurs before beginning: entrance path, under a table, beside a shower base or around a kitchen work area. Location helps frame the care question without turning an everyday pattern into a chemical diagnosis.
MAPEI’s UltraCare maintenance guide recommends routine removal of grit and prompt attention to spills for tile, grout and stone flooring. Its routine-care section uses a mild neutral detergent according to the label, rather than making strong treatment the starting point.
The same guide says to avoid bleach in that routine-care context and limit off-the-shelf high-alkaline cleaners. This is the inspected guide’s maintenance boundary, not a statement that every grout product has identical restrictions.
Keep ordinary removable debris and a remaining mark as separate observations. If the surrounding tile looks clearer after its permitted routine care but one joint stays dark, the useful report is that specific difference.
You can note whether the line is uniform, interrupted or concentrated around one object without scraping it to find out more. Investigation that damages the joint changes the problem you were trying to describe.
Match the proposed method to every contact surface
Read the cleaner’s stated uses, exclusions and application directions alongside the installed materials’ care instructions. A bottle with tile and grout in its name still has limits, so its product category does not finish the compatibility check.
One concrete example is MAPEI UltraCare Acidic Tile & Grout Cleaner, whose US technical sheet excludes acid-sensitive or polished surfaces. It also requires concrete and grout to be fully cured according to their manufacturer’s specifications.
That example explains why a grout-cleaner name cannot justify using it along a polished stone border. It is not a recommendation to use an acidic product for ordinary household joint cleaning or to adapt its dilution from another brand’s recipe.
Check the tool as well as the liquid, including its contact with tile corners, decorative inserts and trim. A brush that fits the joint geometrically still needs to be suitable for the actual neighboring finishes.
If the maker’s instructions require a trial area, choose it according to those directions rather than treating the most visible joint first. A test has to answer a compatibility question before it becomes a plan for the whole room.
Choose a section you can finish
Pick one manageable area with a clear beginning and end, such as the joints beside a single doorway. Keep its location in a note so you can compare the same section after the approved process is complete.
Move ordinary loose objects out of that section where practical, while leaving installed fixtures and damaged parts for their proper assessment. This keeps the cleaning task from quietly becoming a removal or repair project.
Have the permitted application, removal and drying supplies available before you start. A routine that leaves a prepared area unfinished while you search for another tool is harder to control and harder to evaluate later.
Follow the actual product’s protective-equipment, ventilation and handling directions. A stock photo of someone brushing tiles is not a substitute for the label of the product you are using.
Apply only the permitted sequence, without adding another cleaner when the first pass looks disappointing. The right response to a limited result is a clearer question about the installation and mark, rather than a new chemical combination.
Compare the line and the tiles separately
After completing the approved finishing steps, look at both the joint and the tile faces beside it. A cleaner-looking tile does not establish that the grout changed, and a different-looking joint does not establish that the tile finish remained unaffected.
Use a before-and-after image taken from roughly the same angle to support that comparison. Keep the lighting similar if practical, since a joint can look darker in a shadow even when the underlying condition has not changed.
Consider a hypothetical kitchen entrance where the broad tile faces improve but a short line beside the threshold does not. Record those two outcomes instead of giving the whole floor a single success or failure label.
Notice whether a border or trim edge has changed as well, even if it was not your original target. That neighboring observation is part of judging the method’s contact area, not an unrelated detail.
Do not keep escalating pressure to make every line match in one session. A mark that resists the permitted routine process can be handed off with useful evidence before the joint or adjoining finish is altered.
Make recurring care fit the room
Arrange ordinary floor care around the places that actually collect tracked-in soil or spills, while following the installation’s approved methods. A doorway and a rarely used corner may need different attention without requiring different invented rules about their grout.
Keep the compatible cleaner and the relevant care note together so another person can repeat the same bounded task. Write the installed product name and any excluded border material clearly, rather than labeling the bottle safe for the whole house.
If a movable mat or furniture item makes one section hard to inspect, include that access step in the room routine. The aim is to see and reach the known area, not to promise that an arrangement change prevents every stain.
Avoid using a universal annual deep-clean deadline as proof that an intensive treatment is now due. The actual condition and the installed products’ instructions should determine what care is appropriate.
Know when the next job is assessment
Contact the installer when a joint is loose, damaged or repeatedly changes in the same location despite appropriate routine care. Explain the location and visible condition without claiming a cause you have not established.
Send the product identities, the cleaner you used and the before-and-after comparison for that section. Include any change to adjoining tile or trim, since those surfaces shared the cleaning contact.
Ask whether the next step is another specifically approved cleaning method or an inspection of the installation. A useful answer should apply to your grout, tile and border together, rather than to an anonymous dark line in an online picture.
Sources and scope
- MAPEI UltraCare maintenance guide,printed page26
- MAPEI UltraCare Acidic Tile & Grout Cleaner US technical sheet,June13,2023
Sources checked October 14, 2026. This guide uses documented information; it does not claim independent product testing or professional inspection.